Midnight dungeon

The Blinding Vale

The Blinding Vale guide with route schematic, boss mechanics, unlock quest, trash priorities, role notes, and recommended addons.

Current as of July 26, 2026Retail Midnight data is patch-sensitive; verify hotfixes before progression.
ZoneHarandar
Bosses4
UnlockThe Blinding Vale: Lightbloom Roots, or reach level 88
UseLeveling, Heroic, Mythic 0

Map and route

Follow the instance from entrance to completion.

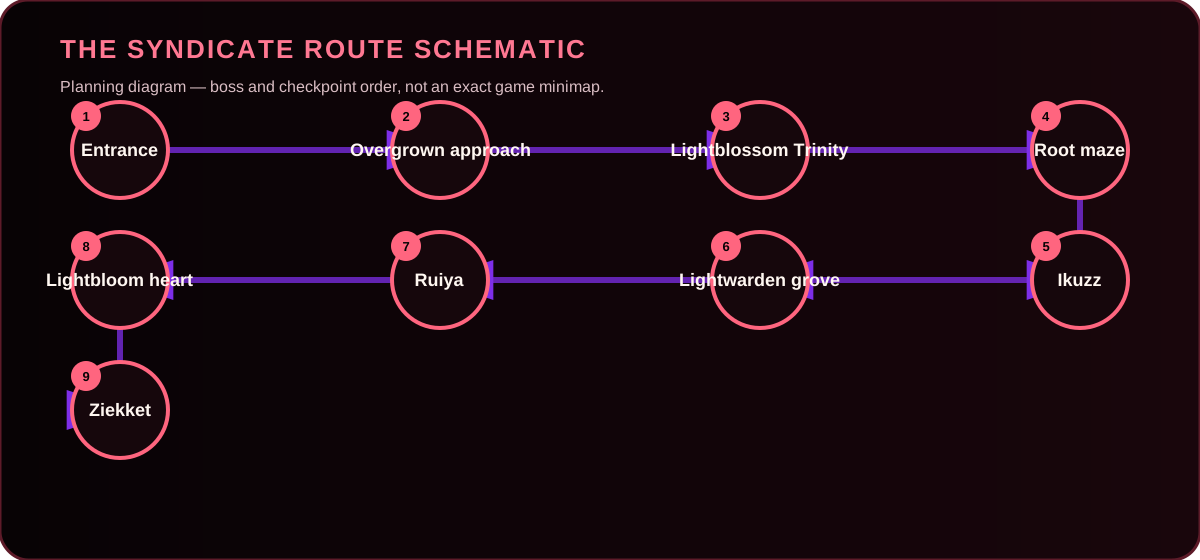
The schematic below is an original planning diagram. Use the in-game map or Mythic Dungeon Tools for exact terrain, enemy positions, and live enemy-forces values.

Original route schematic for The Blinding Vale
Route schematic — planning order only, not a copied or exact in-game minimap.
  1. 1

    Overgrown approach

    Kill lashers before they mature and avoid over-pulling through line-of-sight vegetation.

  2. 2

    Trinity

    Place Fertile Loam intentionally, block Lightblossom Beam, and keep damage balanced because the trio shares health.

  3. 3

    Root maze

    Use roots and line of sight to reduce incoming casts; preserve cooldowns for Ikuzz.

  4. 4

    Ikuzz

    Control roots and intercept the 100-energy fixate path.

  5. 5

    Ruiya

    Keep the arena edge free for Light effects and coordinate dispels.

  6. 6

    Ziekket

    Use Concentrated Lightbeam to remove dormant lashers, intercept Lightbloom Essence before the boss, and manage the temporary damage/healing buff.

Boss mechanics

Assignments that prevent repeat wipes.

Start with the primary call, then assign tank, healer, and DPS responsibilities before the pull.

Boss encounter

Lightblossom Trinity

Primary call: Control the garden and keep the trio stacked when safe.

Key mechanics

  • Fertile Loam is planted by Lightsower Dash.
  • Block Lightblossom Beam so flowers do not gain excess Light-Gorged stacks.
  • Damage is shared between all three bosses.
Tank

Face frontals away, stabilize boss position, and use a defensive for the listed tank-buster window.

Healer

Pre-position for unavoidable group damage, dispel listed effects, and call external defensives before overlaps.

DPS

Interrupt priority casts, swap to required adds or objects, and save burst for exposed or intermission windows.

Boss encounter

Ikuzz the Light Hunter

Primary call: Preserve a clear kite lane and assign an interceptor.

Key mechanics

  • Roots and hunting attacks restrict movement.
  • At full energy, a dangerous fixate must be intercepted or kited through planned space.
  • Avoid stacking targeted impacts.
Tank

Face frontals away, stabilize boss position, and use a defensive for the listed tank-buster window.

Healer

Pre-position for unavoidable group damage, dispel listed effects, and call external defensives before overlaps.

DPS

Interrupt priority casts, swap to required adds or objects, and save burst for exposed or intermission windows.

Boss encounter

Lightwarden Ruiya

Primary call: Rotate the arena and dispel on a fixed priority.

Key mechanics

  • Ruiya combines Light zones, targeted pressure, and a dispel check.
  • Move the boss between clean quadrants instead of filling the center.
  • Use defensives when area denial overlaps party damage.
Tank

Face frontals away, stabilize boss position, and use a defensive for the listed tank-buster window.

Healer

Pre-position for unavoidable group damage, dispel listed effects, and call external defensives before overlaps.

DPS

Interrupt priority casts, swap to required adds or objects, and save burst for exposed or intermission windows.

Boss encounter

Ziekket

Primary call: Aim the beam through lashers and assign safe essence intercepts.

Key mechanics

  • Awaken the Lightbloom activates dormant lashers.
  • Concentrated Lightbeam destroys dormant lashers and leaves Lightsap.
  • Touch Lightbloom Essence before it reaches the boss for a temporary power buff at a health cost.
Tank

Face frontals away, stabilize boss position, and use a defensive for the listed tank-buster window.

Healer

Pre-position for unavoidable group damage, dispel listed effects, and call external defensives before overlaps.

DPS

Interrupt priority casts, swap to required adds or objects, and save burst for exposed or intermission windows.

Trash and route risks

What to stop between bosses.

  • Interrupt Light channels and kill lashers before large pulls mature.
  • Avoid dragging packs through hidden roots and ground blooms.
  • Use Purge/Dispel on absorb or empowerment effects.

Quests and unlocks

Do not leave rewards behind.

  • Unlock quest: The Blinding Vale: Lightbloom Roots.
  • The dungeon also unlocks account-wide at level 88.

Recommended addons

The minimum useful encounter package.

Install through a trusted addon manager or the official project page. For WotLK 3.3.5a, use only versions verified for that client.

Deadly Boss Mods

Boss timers, warnings, pull checks, and role filters.

Setup: Install the Retail release; enable emphasized bars for lethal mechanics.

Official addon page →

WeakAuras

Encounter reminders, debuff tracking, assignments, and class resources.

Setup: Open with /wa; import only current-patch, trusted encounter packages.

Official addon page →

Details!

Damage, healing, interrupts, dispels, deaths, and post-pull analysis.

Setup: Keep Damage Done, Interrupts, and Deaths windows available.

Official addon page →

GTFO

Audio warning when standing in avoidable ground effects.

Setup: Use default sounds first; lower volume only after testing.

Official addon page →

LittleWigs

Dungeon-specific timers when using BigWigs.

Setup: Install with BigWigs and enable role-filtered warnings.

Official addon page →

Final checklist

Before the group enters.

✓ Route reviewed
✓ Interrupts assigned
✓ Dispels confirmed
✓ Boss timers enabled
✓ Consumables ready
✓ Discord voice joined

These guides are planning baselines. Live hotfixes, seasonal affixes, difficulty modifiers, and private-server scripts can alter exact damage, timing, or enemy count. Verify the current in-game journal and your group’s route before the pull.

Sources and revision references